What will METAGENOTE help me do?
- Annotate a group of related samples (labeled as sample group) with sufficient metadata such as sample title, host body site and sequencing instrument.
- Use structured vocabulary and packages that will facilitate reproducibility and future cross-study analyses.
- Validate a sample group table for completion of all fields required by NCBI SRA repository for publication.
- Publish a fully annotated sample group table by sending metadata with associated raw sequencing data to the National Center for Biotechnology Information (NCBI) Sequence Read Archive (SRA) repository and receive notification when submission is in progress and ready.
- You can browse through all sample group tables created and published by other METAGENOTE users.
METAGENOTE Webinar
If you like to know more about METAGENOTE, please visit the following webinar presented by Mariam Quiñones.
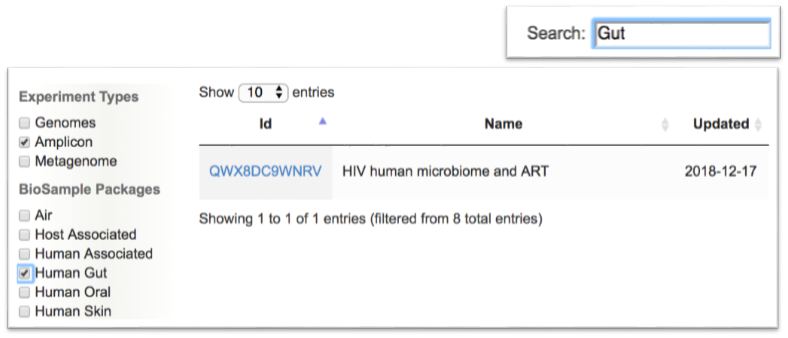
Browse metadata in METAGENOTE
- METAGENOTE will store metadata for each sample group that was successfully published at NCBI.
- To find a specific table, enter a keyword in the Search box or use the filters on the left to filter by experiment type or biome.
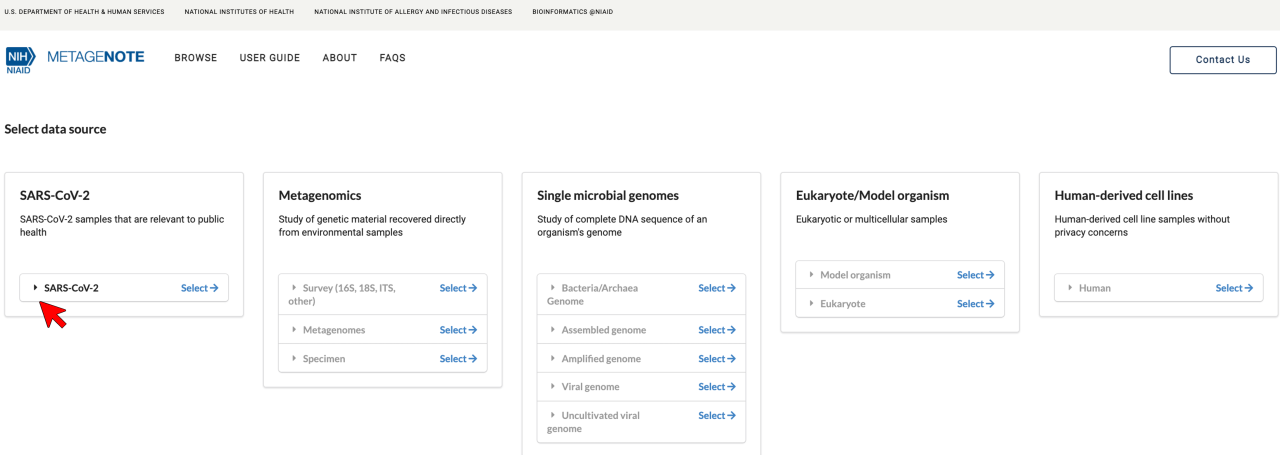
Start a new sample group
Click on Start here!
then proceed to select your desired package from the category shown.
View tutorial: Create a new sample group:
Annotate a Sample Group
Annotate a sample group starting from the selected empty MIMS/MIMARKS template
View tutorial: How to annotate your sample group table in METAGENOTE:
Step 1: Start adding metadata by typing values into the Sample Name column. The metadata will be saved automatically.
Step 2: Continue filling out required metadata attributes (marked by a red asterisk (*)). Utilize the green Default Values row for indicating a value common to all samples. When needed, refer to the help text available on the right pane to learn about format and ontology requirements for the particular field. Complete all other attributes as needed. If one attribute was collected for some samples but not for others, indicate not collected, missing or not applicable. If an attribute was not collected or is not applicable to all samples, leave the entire column blank.
For Host Body Site, use the anatomy diagram to populate the form with proper ontology terms. See the video tutorial for an example.
View tutorial: How to use anatomy browser tool:
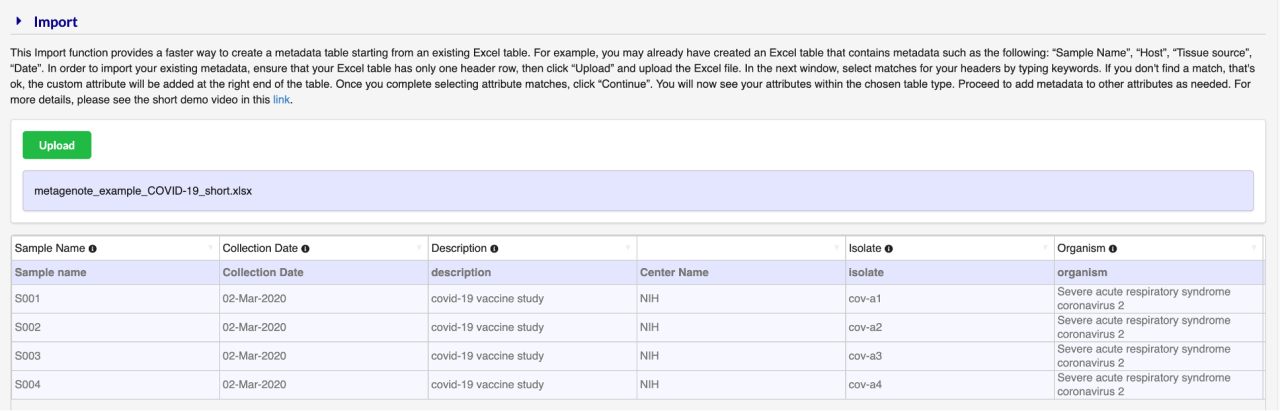
Annotate a sample group by importing metadata from an existing Excel file
In order to save time during metadata annotation, METAGENOTE allows you to import a metadata table previously created in Excel with custom metadata columns.
View tutorial: Import from an Excel file:
Once you have selected your template and give it a sample group name, click the Import, then Upload button to begin the import of an existing metadata table. This step allows the user to import all sample IDs, other attributes matching those in the selected template and also custom metadata attributes not required by the template. This import function will automatically match attributes based on the selected template. For attributes that require ontology terms, an ontology search tool will be provided on the web form. Please note that the excel file should have only one header row.
Publish sample group metadata to SRA
Video tutorial: Submitting samples to NCBI SRA
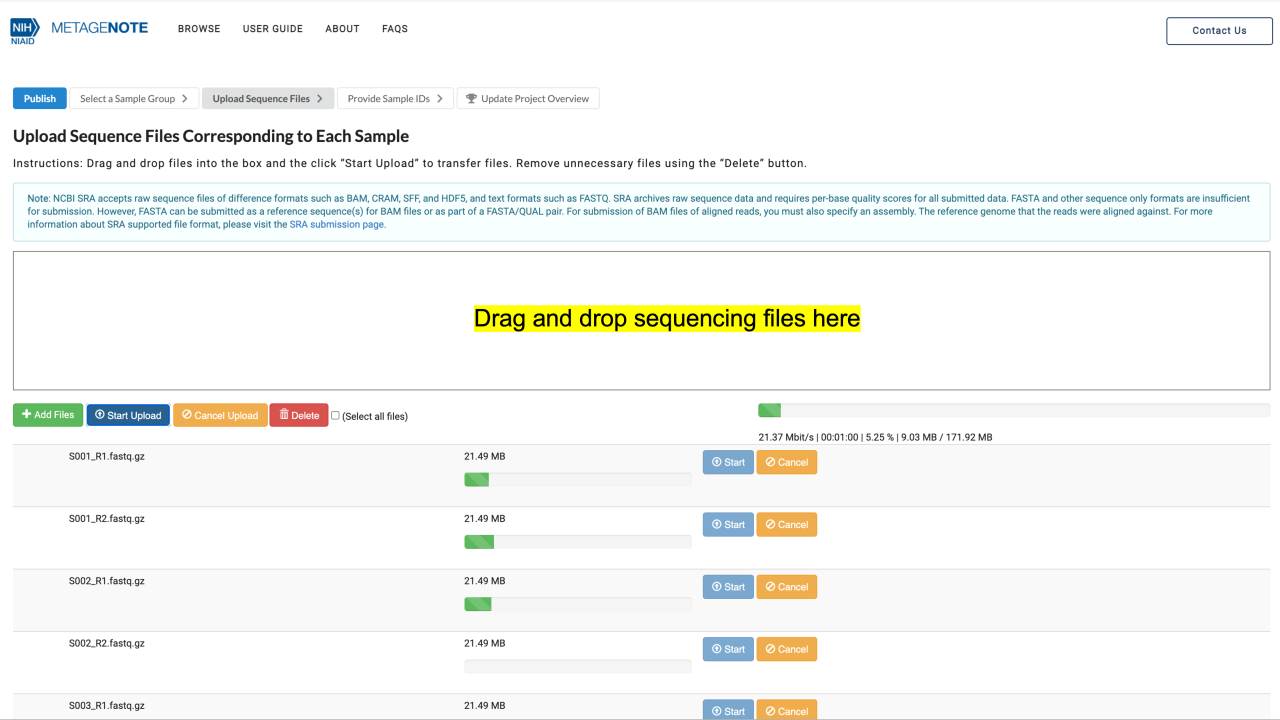
METAGENOTE will help you submit your metadata to the NCBI SRA database in compliance with the journal submission requirements and the Genomics Data Sharing policy. By following the submission steps, you will end up creating the NCBI BioProject and BioSample records automatically. The BioProject ID is what you will then include in your manuscript or send to collaborators who wish to use your data files and metadata. METAGENOTE will provide you a very easy way of uploading your associated raw FASTQ files, which will be sent to NCBI, eliminating the need for sending files separately. In the final submission step, you will need to indicate a new Title and Description, in the way you want it displayed publicly at the NCBI’s BioProject page, therefore please double check your information! If you want to name of the PI and other contact researchers displayed, please add it to the Description box. Once you click Submit, NCBI will validate the transmitted files, provide you with a BioProject ID and soon after your data and metadata will be publicly available.
If you run into problem with your submission, please first check out Troubleshooting SRA submission and Frequently Asked Questions. If you have further questions or concerns about your data or submission, please contact NCBI SRA with your submission's temporary ID in the form of SUB# in the message.
Note: Unless you have logged in as a registered user, your sample group table will be stored temporarily until the SRA acknowledges successful process of your submission.
If your submission encountered problems or is rejected by the SRA, please contact us indicating your submission ID so we can better assist you.
Additional Features for Registered Users
A registered user will also enjoy of the following functionality:
- Create a high level folder (
Study
) to organize related sample groups (more information below). - Save annotated sample group tables as drafts in your private Workspace until ready for publication. Start the publish workflow directly by clicking on the
Publish
button which appears green only when table has been validated for completion of NCBI required fields. - Associate one or more sample group tables with Studies, in a way that is analogous to saving files within a folder inside the main directory of your computer.
- Read existing validated sample group tables created by other members of your group.
How to Submit SARS-CoV-2 Metadata and Files to SRA?
In order to submit SARS-CoV-2 samples to SRA, follow these simple steps (see the Youtube video):
1. Select SARS-CoV-2.
2. Select Clinical or Host-Associated
or Wastewater Surveillance
and give a name and brief description to your sample group. Click Save.

3. Select Import and upload an Excel file with IDs and existing data (if available), otherwise start typing metadata on the columns. Example file: download here.
Import note for COVID-19 submission:
We have prepared an example file. If desired, use this file as a template and substitute sample names and metadata as appropriate. After import proceed to verify that all columns labeled with a red star (*) have metadata; these attributes are required for submission to SRA.
Verify the following:
- If the required metadata is not available for a particular sample, you must use one of the following words: missing, not applicable, or not collected. Do not leave empty cells for a subset of the samples. It is fine to omit entire columns as long as they are not one of the required attributes labeled with the red star.
- Please pay attention to the required formats for
Collection Date (DD-Mmm-Yyyy)
,Geographical Location (USA:MD)
,Latitude and Longitude (39.19 N 77.19 W)
,Host (Genus Species)
,Organism (as found in NCBI Taxonomy)
,Source of UViGs (select from options in template)
, andVirus Enrichment Approach (select from options in template)
. - Use the Host Disease optional field to indicate: COVID-19.
4. When metadata is ready, click Publish.
5. Verify that the Sample Name column and Raw File column correspond to each other.
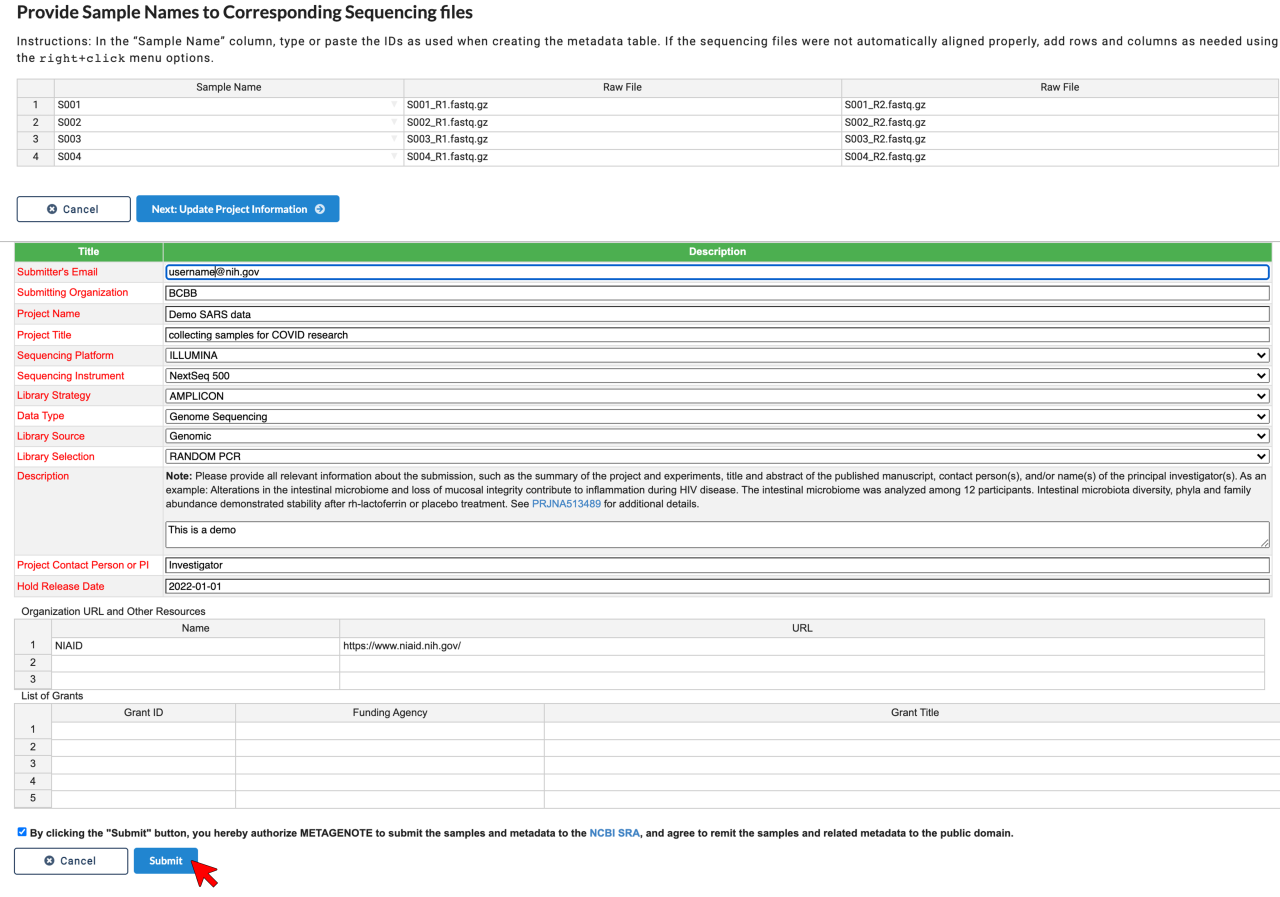
6. Enter metadata for BioProject and click Submit.